In this guide, I’ll go over the map and all treasure locations, what each treasure does, and which ones are worth getting. I’ll also share the strategy and upgrade path I used to get the speedrunner achievement. This guide is not for actual speedrunning.
The Map and Plan
The map is divided into a 16×16 grid, with (1,1) being the top-left corner. Coordinates are written as (X,Y), with X going from left to right and Y going from top to bottom. So, (1,16) would be the bottom-left corner.
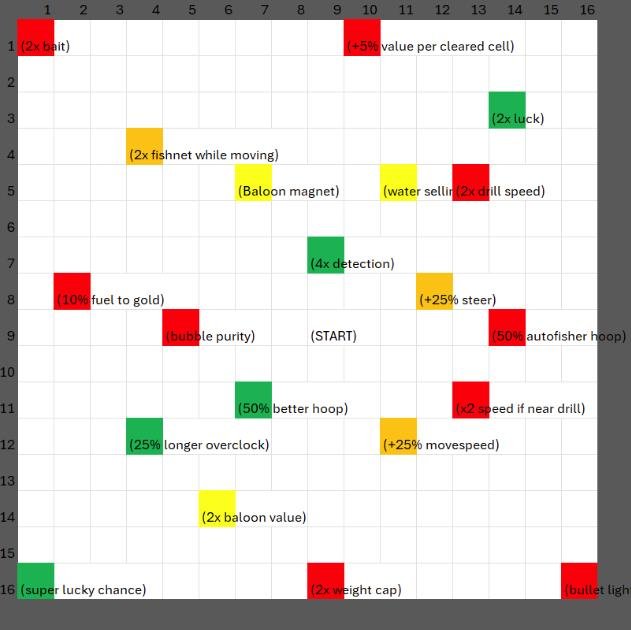
Each colored cell on the map represents a treasure, and (9,9) is our starting position. The goal is to find the quickest route for collecting useful treasures while skipping the ones that won’t help us much.
The plan is divided into three phases: Manual, Manual + Balloons, and Net + Overclock. These phases overlap a little, so some parts might be harder to follow than others.
Manual
This is where we start with manual fishing.
[Add information about how to get the bobber to throw items directly into the grinder.]
[Add information about hoop movement.]
[Add information about which upgrades to prioritize.]
Manual and Balloons
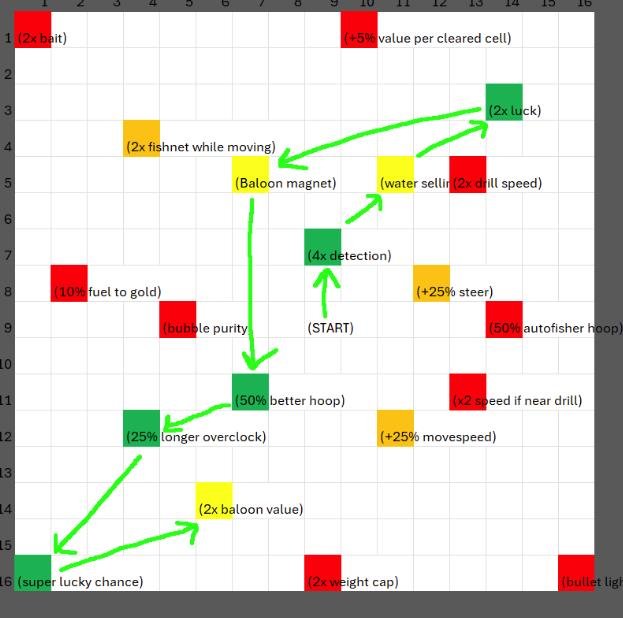
Now that we can move around a bit more, we can start going after some treasures. The closest useful ones are related to balloons, so we’ll focus on three treasures first.
Start by going for the two balloon-related treasures at (7,5) and (11,5). After getting the treasure at (11,5), head to (14,3) to collect the x2 Luck treasure. Then go back and collect the other balloon treasure.
For now, balloons are just helping us earn some extra money while we continue grinding manually. Each balloon can give you a few hundred or more, and the x2 Luck treasure also helps with manual fishing.
I wouldn’t bother focusing on balloons until you get the water-selling treasure at (11,5), since it’s needed to make a decent amount of money from balloons at a distance.
Once you have all three treasures, start heading down toward (7,11) to move on to the next phase.
Update: I found that saving and quitting to the main menu puts you back at the starting position (9,9). I’m not sure if doing this will invalidate your run, but it could be a quicker way to get back instead of traveling from (7,5) to (7,11).
For upgrades during this phase, put a few levels into your balloon stats, but keep upgrading Luck and Carry Capacity as well. You can slow down or stop upgrading manual fishing and start focusing more on your Net and Overclock.
These upgrades become more important in the next phase, but they take some time to set up before you can rely on them.
I wouldn’t put more than three or four levels into balloon upgrades, but getting one or two levels early can still help. After that, unlock Overclock as soon as possible and prioritize Net Speed and Luck.
Net Capacity works pretty much like Fuel Capacity. Only upgrade it when your current capacity isn’t enough to keep up.
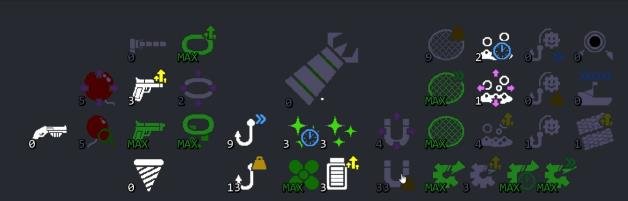
Here are the upgrades I had when I collected the treasure at (7,5).
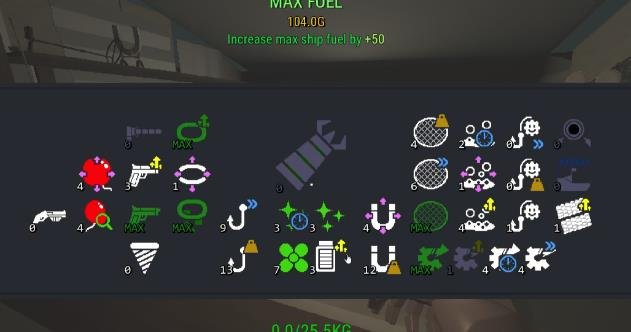
Net and Overclock
Here are the upgrades I had when I finished the game.
After reaching this point, I just kept grinding until I had the 50k needed to get the Heaven Buster.